How I Migrated My Server To RAID With Almost No Downtime
written by Ian McCracken
at Wednesday, June 11, 2008
I recently ran out of space on my home server. I had been feeling a little leery about the lack of redundancy in my setup; I keep all my documents and code in a Subversion repository on that server, and I was in the process of ripping all my DVDs as well (which, of course, precipitated the out-of-spaceness). I bought myself a 750G drive, hopefully to hold the DVDs, but it wasn't enough, so I bought myself three more shiny 750G drives and proceeded down a surprisingly painless path.
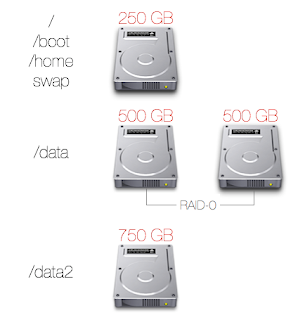
Visual aids might help here. Just so we're clear, here's where the system started out:
And here's where it ended up: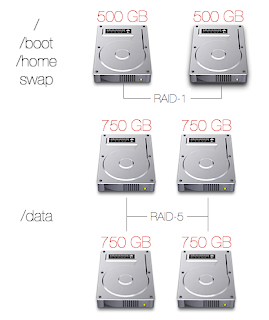
This was all done on the latest Ubuntu 8.04 Hardy. The motherboard allowed for 6 SATA drives. Total time involved was around two days, most of which comprised data transfers and array reshaping. Here's how it was done!
1. Create a 3-disk RAID-5 and move data on existing RAID-0
Because I had a lot of data on the existing 750G drive, I couldn't use it to create the RAID-5. I needed somewhere to dump everything on /data and /data2, however, while I prepared those disks. So I unmounted the /data2 disk and removed it, giving me room to connect the three brand-new 750G drives.
The three new drives were picked up as /dev/sda, /dev/sdb, and /dev/sde. I created the array:
I checked to make sure the array had been made and that it was syncing:
(Those numbers are inaccurate as I pasted them from the current resync which has the extra drive. Still, you get the idea.)
Next, I created a filesystem on the array:
I mounted the drive and began copying over everything in /data:
Then I went to bed. We had around 960GB of video in /data, and copying it over took five or six hours. Luckily, the array can be used immediately after creation, even though it's still syncing.
When I woke up, I double-checked that everything in /data had made it to the new array; it had. Pushing down the fear that arises automatically when making irreversible changes, I unmounted and stopped the RAID-0:
Next I needed to destroy the array so that it wouldn't be reassembled on a reboot. This probably wasn't necessary, since I was going to use the drives in a new array immediately, but I wanted to make sure. The drives in that array were /dev/sdc and /dev/sdd.
The RAID-1 needed to have four partitions, corresponding to the four partitions existing on the 250G drive off of which the system was currently running. At this point, I had to decide whether I wanted to partition an array, or make arrays out of partitions. I googled around and found that, apparently, the former is a terrible idea. The thinking is this: if you partition an array, and a disk dies, you can't run off the single disk while the array is rebuilding. Also, GRUB needs something to boot from, which it clearly can't do if the bootable partition exists only inside a RAID. So the latter was the way to go.
Because the 250G and 500G disks were different sizes, I created the partitions from scratch on /dev/sdc using fdisk. Here's the result:
All I had to do here was copy the files from each partition on the running system to its corresponding array. It went like this:
No big deal there. The
Next I needed to work with that system, editing fstab and installing GRUB, so it would boot to the arrays and whatnot. Still as root, I mounted the arrays and chrooted in:
First, I installed GRUB on both drives making up the array. This ensures that if one disk dies, we could still boot off of the degraded array. Still inside chroot:
For those unfamiliar with GRUB, let me explain that. First, I used the
The only thing left was to change the GRUB menu so it would use the right root. To do that, I edited /boot/grub/menu.lst (again, still in the chroot). The top two entries were the most recent kernel and the most recent kernel in recovery mode; those were the ones I changed. Specifically, I edited the root line to point to the correct partition on the drive, and the kernel line so that the root option pointed to the / array:
I then duplicated those, changing (hd0,0) to (hd1,0) in the second copies, so that it could boot if /dev/sdc failed. I'm not sure I needed to do that, or that it will do anything, because I don't really understand GRUB that well, so don't quote me.
Here's where I ran into the only wrinkle in this process. I rebooted, making sure that my first boot drive was one of the 500G. All went well at first; it found GRUB, it brought up the Ubuntu splash screen...and then it hung there for a couple of minutes before throwing me into BusyBox. Not disheartened, I rebooted and went into the GRUB menu so I could edit the menu options. When I replaced the kernel line's
After a brief period of dismay, I googled around and discovered that the ramdisk being used to boot needed to be rebuilt so that it would have the modules it needed to assemble the arrays before mounting the root filesystem. I booted into the original system, mounted all the arrays as above, chrooted in, and ran:
This regenerated the ramdisk, but it still couldn't assemble the arrays. I was at a loss for a while, until I found this bug report which hinted at the solution. Apparently,
I rebooted to a fully functional system!
I had read this post before starting this process, and a good thing, because a comment turned out to be very helpful. I upped the RAID reconstruction speeds:
The drives started going crazy, resyncing themselves to include the new drive. I checked /proc/mdstat; it was reshaping the array at 20-25M/sec, and was going to take at least twelve hours. Bedtime once more!
Once I awoke, I waited for the drives to stop syncing (indeed, twelve hours almost on the dot). Then I resized the filesystem to use the extra space:
I had read that this could take half an hour. It did not; it took about eight minutes. The result:
Hooray! Almost a terabyte free. Much more, once I recode all those DVDs to mp4.
Just to be safe, since I did change the RAID setup, I rebuilt the initramfs again:
All in all, the server's downtime was only an hour or so, most of which was spent struggling with that initramfs problem. I was watching video off of that server during almost the entire process, with no noticeable slowdown. It was amazingly easy, and I'm ecstatic that mdadm, and Linux in general, have the tools available to make this so painless. Unfortunately, I don't have space for any more SATA drives, so if I ever need to expand the RAID again I'll have to build a NAS...
Visual aids might help here. Just so we're clear, here's where the system started out:

And here's where it ended up:

This was all done on the latest Ubuntu 8.04 Hardy. The motherboard allowed for 6 SATA drives. Total time involved was around two days, most of which comprised data transfers and array reshaping. Here's how it was done!
1. Create a 3-disk RAID-5 and move data on existing RAID-0
Because I had a lot of data on the existing 750G drive, I couldn't use it to create the RAID-5. I needed somewhere to dump everything on /data and /data2, however, while I prepared those disks. So I unmounted the /data2 disk and removed it, giving me room to connect the three brand-new 750G drives.The three new drives were picked up as /dev/sda, /dev/sdb, and /dev/sde. I created the array:
ian@castafiore:~$ sudo mdadm --create --verbose /dev/md1 --level=5 --raid-devices=3 /dev/sda /dev/sdb /dev/sde
I checked to make sure the array had been made and that it was syncing:
ian@castafiore:~$ cat /proc/mdstat
md1 : active raid5 sda[0] sde[2] sdb[1]
   1465148928 blocks super 0.91 level 5, 64k chunk, algorithm 2 [4/4] [UUUU]
   [==================>..]  resync = 94.0% (688742848/732574464) finish=1.6min speed=25491K/sec
(Those numbers are inaccurate as I pasted them from the current resync which has the extra drive. Still, you get the idea.)
Next, I created a filesystem on the array:
ian@castafiore:~$ sudo mkfs.reiserfs /dev/md1
I mounted the drive and began copying over everything in /data:
ian@castafiore:~$ mkdir raidtmp
ian@castafiore:~$ sudo mount /dev/md1 raidtmp
ian@castafiore:~$ cp -ax /data/* raidtmp
Then I went to bed. We had around 960GB of video in /data, and copying it over took five or six hours. Luckily, the array can be used immediately after creation, even though it's still syncing.
2. Destroy the RAID-0
When I woke up, I double-checked that everything in /data had made it to the new array; it had. Pushing down the fear that arises automatically when making irreversible changes, I unmounted and stopped the RAID-0:
ian@castafiore:~$ sudo umount /dev/md0
ian@castafiore:~$ sudo mdadm --stop /dev/md0
mdadm: stopped /dev/md0
Next I needed to destroy the array so that it wouldn't be reassembled on a reboot. This probably wasn't necessary, since I was going to use the drives in a new array immediately, but I wanted to make sure. The drives in that array were /dev/sdc and /dev/sdd.
ian@castafiore:~$ sudo mdadm --zero-superblock /dev/sdc
ian@castafiore:~$ sudo mdadm --zero-superblock /dev/sdd
3. Create the RAID-1
The RAID-1 needed to have four partitions, corresponding to the four partitions existing on the 250G drive off of which the system was currently running. At this point, I had to decide whether I wanted to partition an array, or make arrays out of partitions. I googled around and found that, apparently, the former is a terrible idea. The thinking is this: if you partition an array, and a disk dies, you can't run off the single disk while the array is rebuilding. Also, GRUB needs something to boot from, which it clearly can't do if the bootable partition exists only inside a RAID. So the latter was the way to go.
Because the 250G and 500G disks were different sizes, I created the partitions from scratch on /dev/sdc using fdisk. Here's the result:
# partition table of /dev/sdc
unit: sectors

/dev/sdc1 : start=       63, size=   979902, Id=fd, bootable
/dev/sdc2 : start=   979965, size= 97659135, Id=fd
/dev/sdc3 : start= 98639100, size=  8000370, Id=fd
/dev/sdc4 : start=106639470, size=870128595, Id=fd
FD, which is "Linux RAID Autodetect." Also notice that /dev/sdc1 is marked as bootable; that's going to be /boot.Next, I wrote /dev/sdc's partition table to /dev/sdd so the drives would be identical:
ian@castafiore:~$ sudo sfdisk -d /dev/sdc | sudo sfdisk /dev/sdd
I was ready to create the arrays.
ian@castafiore:~$ sudo mdadm --create /dev/md0 --level=mirror --raid-devices=2 /dev/sdc1 /dev/sdd1
ian@castafiore:~$ sudo mdadm --create /dev/md2 --level=mirror --raid-devices=2 /dev/sdc2 /dev/sdd2
ian@castafiore:~$ sudo mdadm --create /dev/md3 --level=mirror --raid-devices=2 /dev/sdc3 /dev/sdd3
ian@castafiore:~$ sudo mdadm --create /dev/md4 --level=mirror --raid-devices=2 /dev/sdc4 /dev/sdd4
ian@castafiore:~$ sudo mkfs.reiserfs /dev/md0
ian@castafiore:~$ sudo mkfs.reiserfs /dev/md2
ian@castafiore:~$ sudo mkswap /dev/md3
ian@castafiore:~$ sudo mkfs.reiserfs /dev/md4
4. Migrate the existing system to the RAID-1
All I had to do here was copy the files from each partition on the running system to its corresponding array. It went like this:
ian@castafiore:~$ sudo su -
root@castafiore:~# mkdir mnt

root@castafiore:~# mount /dev/md0 mnt
root@castafiore:~# cd /boot
root@castafiore:/boot# find . -xdev -print0 | cpio -0pdvum --sparse ~/mnt
root@castafiore:/boot# umount /root/mnt

root@castafiore:/# mount /dev/md2 /root/mnt
root@castafiore:~# cd /
root@castafiore:/# find . -xdev -print0 | cpio -0pdvum --sparse ~/mnt
root@castafiore:/# umount /root/mnt

root@castafiore:~# mount /dev/md4 /root/mnt
root@castafiore:~# cd /home
root@castafiore:/home# find . -xdev -print0 | cpio -0pdvum --sparse ~/mnt
root@castafiore:/home# umount /root/mnt
No big deal there. The
-xdev option keeps find from descending into other filesystems.Next I needed to work with that system, editing fstab and installing GRUB, so it would boot to the arrays and whatnot. Still as root, I mounted the arrays and chrooted in:
root@castafiore:/home# cd
root@castafiore:~# mount /dev/md2 mnt
root@castafiore:~# mount /dev/md0 mnt/boot
root@castafiore:~# mount /dev/md4 mnt/home
root@castafiore:~# mount -o bind /dev/ mnt/dev
root@castafiore:~# mount -t proc none mnt/proc
root@castafiore:~# chroot mnt /bin/bash
root@castafiore:/#
/etc/fstab, changing all /dev/sdf* references to the appropriate /dev/md*. Looking back, I probably should have used UUIDs instead, but since the arrays aren't going to change their device names (while hard disks certainly might) I think I'll be all right.5. Make the RAID-1 bootable
First, I installed GRUB on both drives making up the array. This ensures that if one disk dies, we could still boot off of the degraded array. Still inside chroot:
root@castafiore:/# grub
    [ Minimal BASH-like line editing is supported.   For
      the   first   word,  TAB  lists  possible  command
      completions.  Anywhere else TAB lists the possible
      completions of a device/filename. ]

grub> device (hd0) /dev/sdc

grub> root (hd0,0)

grub> setup (hd0)
...
...
grub> device (hd1) /dev/sdd

grub> root (hd1,0)

grub> setup (hd1)
...
...
grub> quit
root@castafiore:/#
For those unfamiliar with GRUB, let me explain that. First, I used the
device command to make sure I was dealing with the right disk, by telling it that (hd0) was /dev/sdc. Then I told it that the first partition was the boot partition with root (hd0,0). If /boot were the second partition it would have been root (hd0,1), etc. Finally, GRUB is installed on that disk with setup (hd0). Then I did the exact same thing to /dev/sdd, only of course I used (hd1).The only thing left was to change the GRUB menu so it would use the right root. To do that, I edited /boot/grub/menu.lst (again, still in the chroot). The top two entries were the most recent kernel and the most recent kernel in recovery mode; those were the ones I changed. Specifically, I edited the root line to point to the correct partition on the drive, and the kernel line so that the root option pointed to the / array:
title           Ubuntu 8.04, kernel 2.6.24-16-generic
root            (hd0,0)
kernel          /vmlinuz-2.6.24-16-generic root=/dev/md2 ro quiet splash
initrd          /initrd.img-2.6.24-16-generic
quiet

title           Ubuntu 8.04, kernel 2.6.24-16-generic (recovery mode)
root            (hd0,0)
kernel          /vmlinuz-2.6.24-16-generic root=/dev/md2 ro single
initrd          /initrd.img-2.6.24-16-generic
I then duplicated those, changing (hd0,0) to (hd1,0) in the second copies, so that it could boot if /dev/sdc failed. I'm not sure I needed to do that, or that it will do anything, because I don't really understand GRUB that well, so don't quote me.
6. Reboot to the RAID-1
Here's where I ran into the only wrinkle in this process. I rebooted, making sure that my first boot drive was one of the 500G. All went well at first; it found GRUB, it brought up the Ubuntu splash screen...and then it hung there for a couple of minutes before throwing me into BusyBox. Not disheartened, I rebooted and went into the GRUB menu so I could edit the menu options. When I replaced the kernel line's
root=/dev/md2 with root=/dev/sdc2, I was able to boot just fine, but the /dev/md2 array was inactive.After a brief period of dismay, I googled around and discovered that the ramdisk being used to boot needed to be rebuilt so that it would have the modules it needed to assemble the arrays before mounting the root filesystem. I booted into the original system, mounted all the arrays as above, chrooted in, and ran:
root@castafiore:/# update-initramfs -u
This regenerated the ramdisk, but it still couldn't assemble the arrays. I was at a loss for a while, until I found this bug report which hinted at the solution. Apparently,
update-initramfs uses /etc/mdadm/mdadm.conf to decide how to compile the ramdisk, and I hadn't modified that. After looking around a little more, I discovered that this was simple to generate. I made sure that the arrays were all up and running with cat /proc/mdstat, then I did (still in chroot, of course):
root@castafiore:/# mdadm --detail --scan > /etc/mdadm/mdadm.conf
root@castafiore:/# update-initramfs -u
I rebooted to a fully functional system!
7. Add the 750G to the existing RAID-5
I was almost home. I could go on with the system as it was, but I had that 750G drive lying around, and I wanted to add it to the RAID-5. First, I removed the 250G drive that had the old system on it, giving me another SATA slot. I installed the 750G drive and booted up. Next, I mounted the drive and copied all the data on it to the RAID-5. That took three or four hours. Then I used fdisk to delete the partition table (so it would be like all the others).I had read this post before starting this process, and a good thing, because a comment turned out to be very helpful. I upped the RAID reconstruction speeds:
ian@castafiore:~$ sudo su -
root@castafiore:~# echo 25000 > /proc/sys/dev/raid/speed_limit_min
root@castafiore:~#  echo 400000 >/proc/sys/dev/raid/speed_limit_max
ian@castafiore:~$ sudo mdadm --add /dev/md1 /dev/sdf
ian@castafiore:~$ sudo mdadm --grow /dev/md1 --raid-devices=4
The drives started going crazy, resyncing themselves to include the new drive. I checked /proc/mdstat; it was reshaping the array at 20-25M/sec, and was going to take at least twelve hours. Bedtime once more!
Once I awoke, I waited for the drives to stop syncing (indeed, twelve hours almost on the dot). Then I resized the filesystem to use the extra space:
root@castafiore:~# umount /dev/md1
root@castafiore:~# resize_reiserfs /dev/md1
I had read that this could take half an hour. It did not; it took about eight minutes. The result:
ian@castafiore:~$ df -h
Filesystem            Size  Used Avail Use% Mounted on
/dev/md2               47G  5.9G   41G  13% /
varrun               1014M  140K 1013M   1% /var/run
varlock              1014M     0 1014M   0% /var/lock
udev                 1014M  100K 1013M   1% /dev
devshm               1014M     0 1014M   0% /dev/shm
lrm                  1014M   38M  976M   4% /lib/modules/2.6.24-16-generic/volatile
/dev/md0              479M   68M  411M  15% /boot
/dev/md4              415G  5.4G  410G   2% /home
/dev/md1              2.1T  1.2T  901G  58% /data
Hooray! Almost a terabyte free. Much more, once I recode all those DVDs to mp4.
Just to be safe, since I did change the RAID setup, I rebuilt the initramfs again:
ian@castafiore:~$ sudo su -
root@castafiore:/# mdadm --detail --scan > /etc/mdadm/mdadm.conf
root@castafiore:/# update-initramfs -u
All in all, the server's downtime was only an hour or so, most of which was spent struggling with that initramfs problem. I was watching video off of that server during almost the entire process, with no noticeable slowdown. It was amazingly easy, and I'm ecstatic that mdadm, and Linux in general, have the tools available to make this so painless. Unfortunately, I don't have space for any more SATA drives, so if I ever need to expand the RAID again I'll have to build a NAS...

